Ingest data from PostgreSQL CDC
Change Data Capture (CDC) refers to the process of identifying and capturing data changes in a database, and then delivering the changes to a downstream service in real time.
RisingWave supports ingesting CDC data from PostgreSQL. Versions 10, 11, 12, 13, 14, and 15 of PostgreSQL are supported.
You can ingest CDC data from PostgreSQL into RisingWave in two ways:
Using the built-in PostgreSQL CDC connector
With this connector, RisingWave can connect to PostgreSQL databases directly to obtain data from the binlog without starting additional services.
Using a CDC tool and a message broker
You can use a CDC tool and then use the Kafka, Pulsar, or Kinesis connector to send the CDC data to RisingWave. For more details, see the Create source via event streaming systems topic.
Set up PostgreSQL
- Self-hosted
- AWS RDS PostgreSQL and Aurora (PostgreSQL-Compatible)
Ensure that
wal_levelislogical. Check by using the following statement.SHOW wal_level;By default, it is
replica. For CDC, you will need to set it to logical in the database configuration file (postgresql.conf) or via apsqlcommand. The following command will change thewal_level.ALTER SYSTEM SET wal_level = logical;Keep in mind that changing the
wal_levelrequires a restart of the PostgreSQL instance and can affect database performance.noteIf you choose to create multiple CDC tables without using a shared source, be sure to set
max_wal_sendersto be greater than or equal to the number of synced tables. By default,max_wal_sendersis 10.Assign
REPLICATION,LOGIN,andCREATEDBrole attributes to the user.For an existing user, run the following statement to assign the attributes:
ALTER USER <username> REPLICATION LOGIN CREATEDB;For a new user, run the following statement to create the user and assign the attributes:
CREATE USER <username> REPLICATION LOGIN CREATEDB;You can check your role attributes by using the
\dupsql command:dev-# \du
List of roles
Role name | Attributes | Member of
-----------+-----------------------------------------------------------+---------
rw | Create DB, Replication | {}
postgres | Superuser, Create role, Create DB, Replication, Bypass RLS | {}Grant required privileges to the user.
Run the following statements to grant the required privileges to the user.
GRANT CONNECT ON DATABASE <database_name> TO <username>;
GRANT USAGE ON SCHEMA <schema_name> TO <username>;
GRANT SELECT ON ALL TABLES IN SCHEMA <schema_name> TO <username>;
GRANT CREATE ON DATABASE <database_name> TO <username>;
You can use the following statement to check the privileges of the user to the tables:
postgres=# SELECT table_name, grantee, privilege_type
FROM information_schema.role_table_grants
WHERE  grantee='<username>';
An example result:
 table_name | grantee | privilege_type
 -----------+---------+----------------
 lineitem   | rw      | SELECT
 customer   | rw      | SELECT
 nation     | rw      | SELECT
 orders     | rw      | SELECT
 part       | rw      | SELECT
 partsupp   | rw      | SELECT
 supplier   | rw      | SELECT
 region     | rw      | SELECT
 (8 rows)
Here we will use a standard class AWS RDS PostgreSQL instance without Multi-AZ deployment for illustration, but the process will be similar for Aurora.
Check whether the
wal_levelparameter is set tological. If it islogicalthen we are done. Otherwise, create a parameter group for your Postgres instance. We created a parameter group named pg-cdc for the instance that is running Postgres 12. Next, click the pg-cdc parameter group to edit the value ofrds.logical_replicationto 1.If you choose to create multiple CDC tables without using a shared source, set
max_wal_sendersto be greater than or equal to the number of synced tables. By default,max_wal_sendersis 20 for versions 13 and later.noteThere is a known issue regarding the WAL write-through cache of AWS Aurora PostgreSQL, which leads to data loss. This affects Aurora PostgreSQL versions 14.5, 13.8, 12.12, and 11.17. To avoid this, set the
rds.logical_wal_cacheparameter to 0.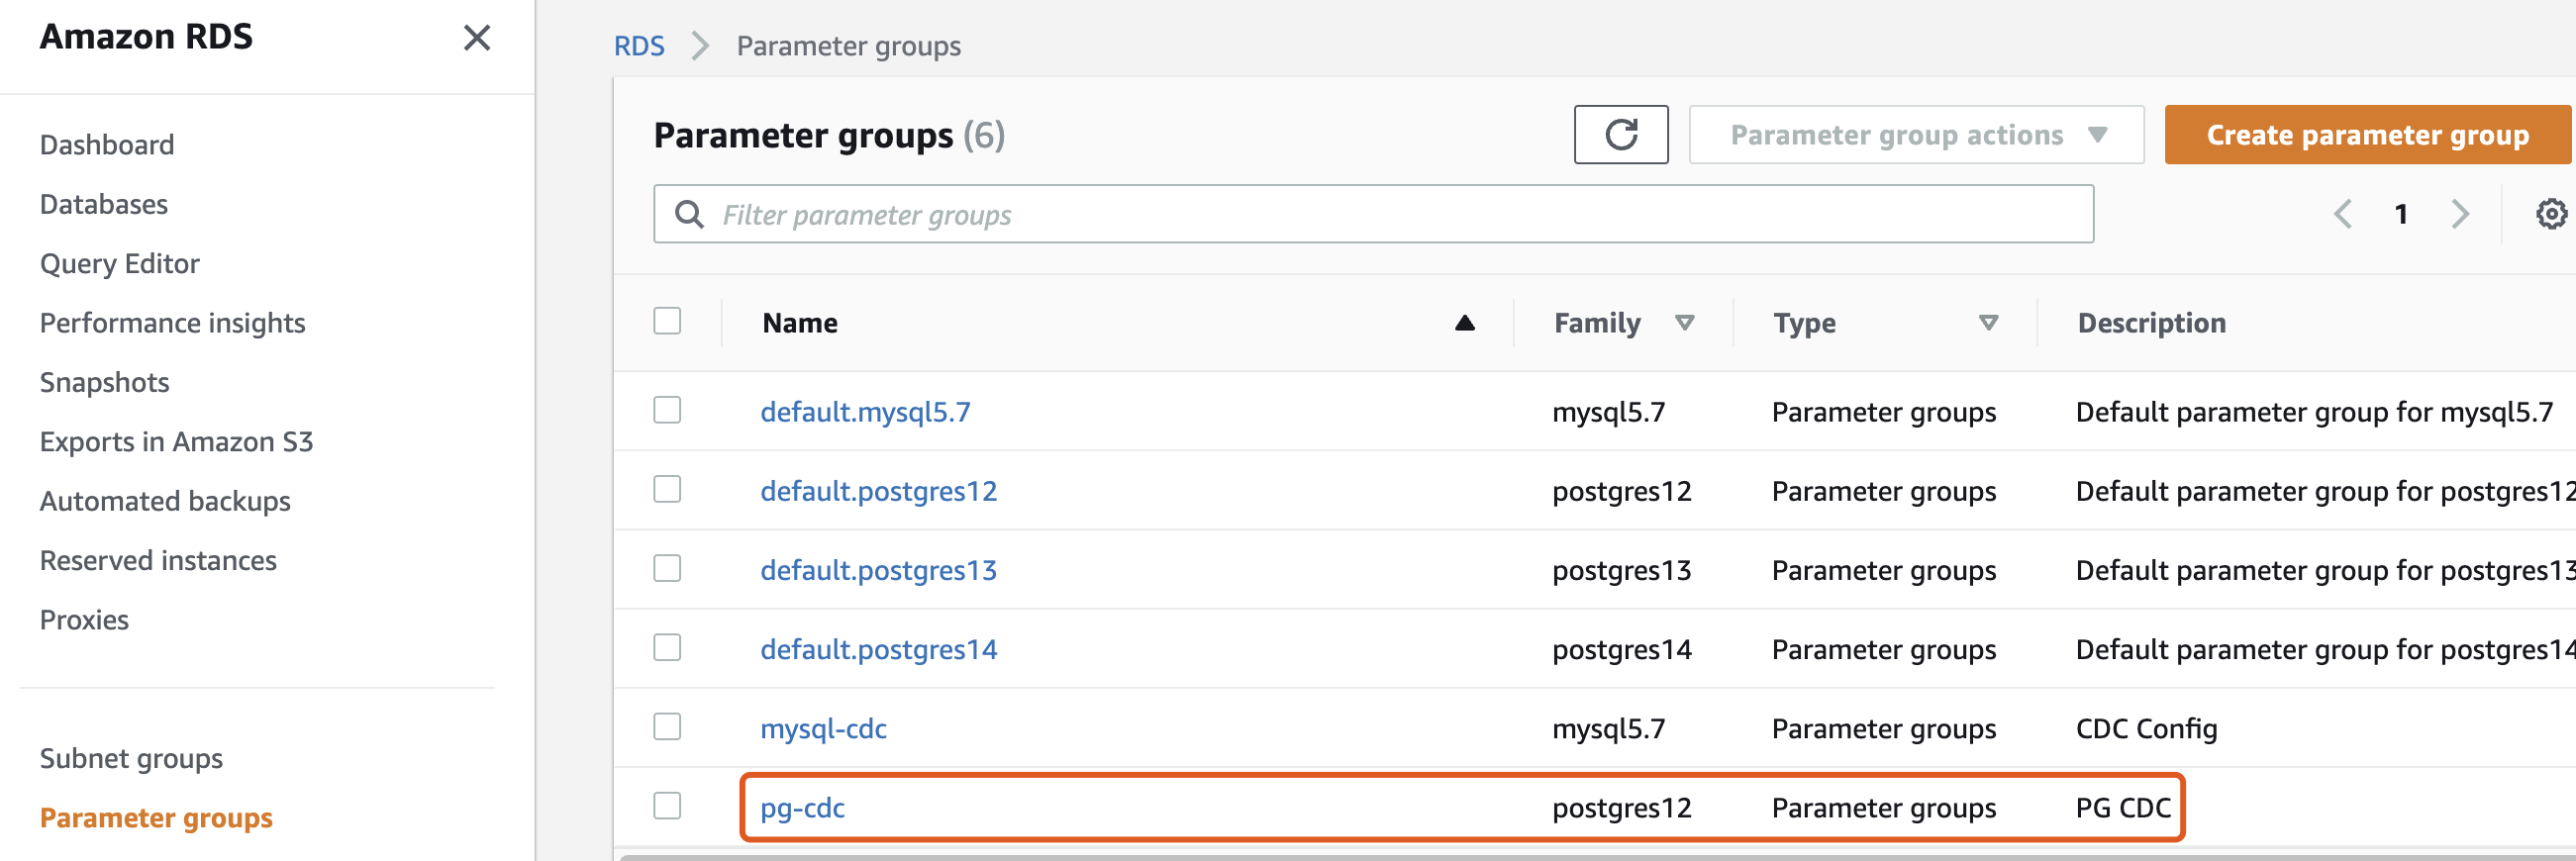
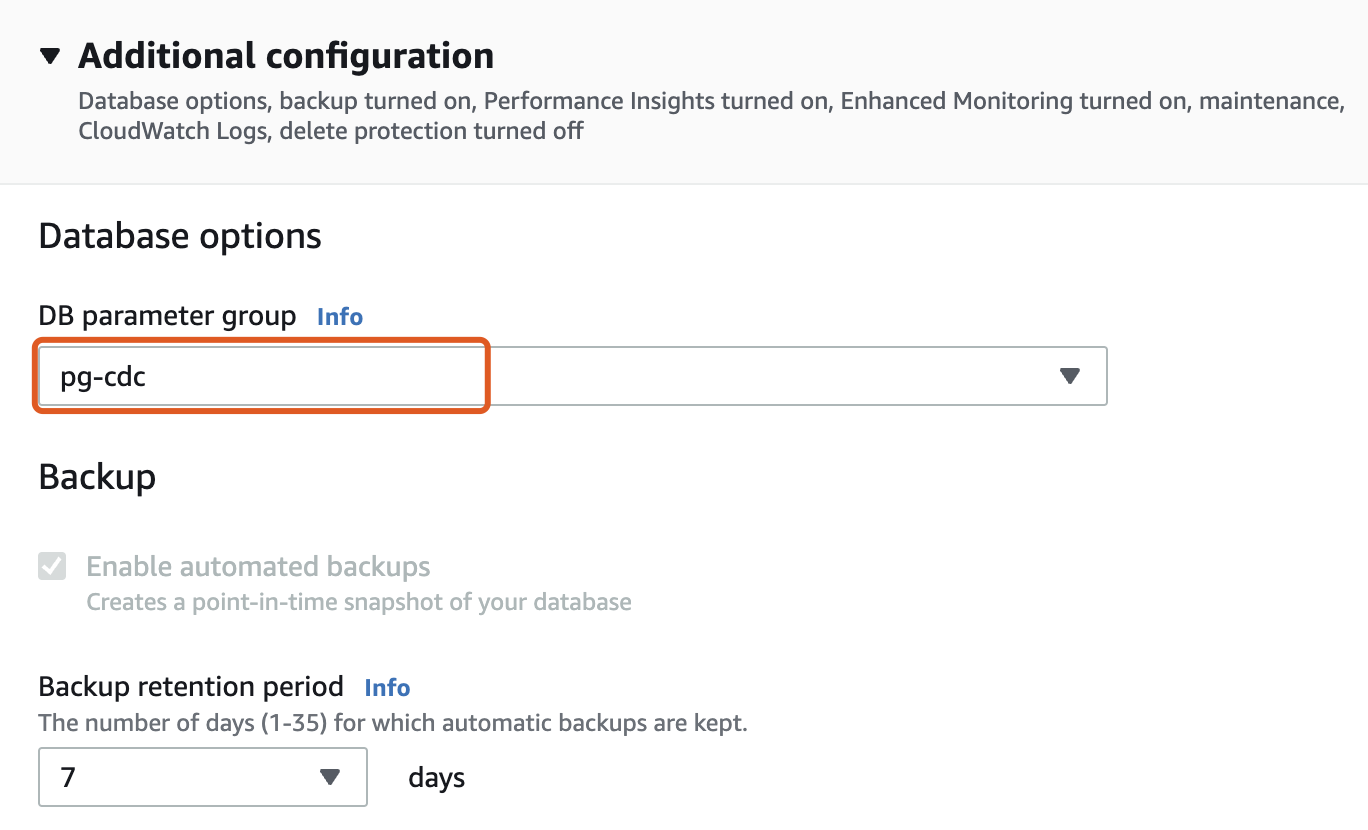
Go to the Databases page and modify your instance to use the pg-cdc parameter group.
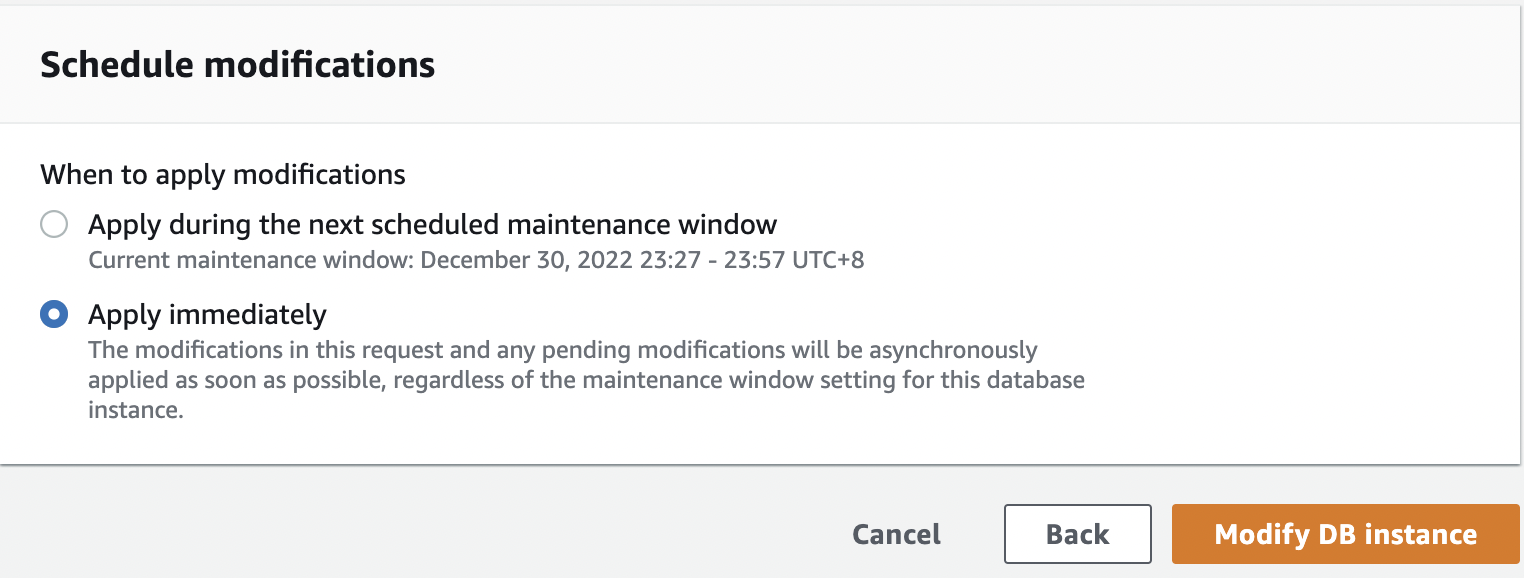
Click Continue and choose Apply immediately. Finally, click Modify DB instance to save changes. Remember to reboot the Postgres instance to put the changes into effect.
Grant the RDS replication privileges to the user.
GRANT rds_replication TO <username>;
Notes about running RisingWave from binaries
If you are running RisingWave locally from binaries and intend to use the native CDC source connectors or the JDBC sink connector, make sure that you have JDK 11 or a later version installed in your environment.
Create a table using the native CDC connector
To ensure all data changes are captured, you must create a table or source and specify primary keys. See the CREATE TABLE command for more details.
Syntax
Syntax for creating a CDC source.
CREATE SOURCE [ IF NOT EXISTS ] source_name WITH (
   connector='postgres-cdc',
   <field>=<value>, ...
);
Syntax for creating a CDC table. Note that a primary key is required and must be consistent with the upstream table.
CREATE TABLE [ IF NOT EXISTS ] table_name (
   column_name data_type PRIMARY KEY , ...
   PRIMARY KEY ( column_name, ... )
)
WITH (
    snapshot='true'
)
FROM source TABLE table_name;
To check the progress of backfilling historical data, find the corresponding internal table using the SHOW INTERNAL TABLES command and query from it.
Connector parameters
Unless specified otherwise, the fields listed are required. Note that the value of these parameters should be enclosed in single quotation marks.
| Field | Notes |
|---|---|
| hostname | Hostname of the database. |
| port | Port number of the database. |
| username | Username of the database. |
| password | Password of the database. |
| database.name | Name of the database. |
| schema.name | Optional. Name of the schema. By default, the value is public. |
| table.name | Name of the table that you want to ingest data from. |
| slot.name | Optional. The replication slot for this PostgreSQL source. By default, a unique slot name will be randomly generated. Each source should have a unique slot name. |
| publication.name | Optional. Name of the publication. By default, the value is rw_publication. For more information, see Multiple CDC source tables. |
| publication.create.enable | Optional. By default, the value is 'true'. If publication.name does not exist and this value is 'true', a publication.name will be created. If publication.name does not exist and this value is 'false', an error will be returned. |
| transactional | Optional. Specify whether you want to enable transactions for the CDC table that you are about to create. By default, the value is 'true' for shared sources, and 'false' otherwise. This feature is also supported for shared CDC sources for multi-table transactions. For details, see Transaction within a CDC table. |
RisingWave implements CDC via PostgreSQL replication. Inspect the current progress via the pg_replication_slots view. Remove inactive replication slots via pg_drop_replication_slot(). RisingWave does not automatically drop inactive replication slots. You must do this manually to prevent WAL files from accumulating in the upstream PostgreSQL database.
The following fields are used when creating a CDC table.
| Field | Notes |
|---|---|
| snapshot | Optional. If false, CDC backfill will be disabled and only upstream events that have occurred after the creation of the table will be consumed. This option can only be applied for tables created from a shared source. |
Debezium parameters
Debezium v2.4 connector configuration properties can also be specified under the WITH clause when creating a table or shared source. Add the prefix debezium. to the connector property you want to include.
For instance, to skip unknown DDL statements, specify the schema.history.internal.skip.unparseable.ddl parameter as debezium.schema.history.internal.skip.unparseable.ddl.
CREATE SOURCE pg_mydb WITH (
    connector = 'postgres-cdc',
    hostname = '127.0.0.1',
    port = '8306',
    username = 'root',
    password = '123456',
    database.name = 'mydb',
    slot.name = 'mydb_slot',
    debezium.schema.history.internal.skip.unparseable.ddl = 'true'
);
Data format
Data is in Debezium JSON format. Debezium is a log-based CDC tool that can capture row changes from various database management systems such as PostgreSQL, MySQL, and SQL Server and generate events with consistent structures in real time. The PostgreSQL CDC connector in RisingWave supports JSON as the serialization format for Debezium data. The data format does not need to be specified when creating a table with postgres-cdc as the source.
Examples
Connect to the upstream database by creating a CDC source using the CREATE SOURCE command and PostgreSQL CDC parameters. The data format is fixed as FORMAT PLAIN ENCODE JSON so it does not need to be specified.
CREATE SOURCE pg_mydb WITH (
    connector = 'postgres-cdc',
    hostname = '127.0.0.1',
    port = '8306',
    username = 'root',
    password = '123456',
    database.name = 'mydb',
    slot.name = 'mydb_slot'
);
With the source created, you can create multiple CDC tables that ingest data from different tables and schemas in the upstream database without needing to specify the database connection parameters again.
For instance, the following CDC table in RisingWave ingests data from table tt3 in the schema public. When specifying the PostgreSQL table name in the FROM clause after the keyword TABLE, the schema name must also be specified.
CREATE TABLE tt3 (
    v1 integer primary key,
    v2 timestamp with time zone
) FROM pg_mydb TABLE 'public.tt3';
You can also create another CDC table in RisingWave that ingests data from table tt4 in the schema ods.
CREATE TABLE tt4 (
  v1 integer primary key,
  v2 varchar,
  PRIMARY KEY (v1)
) FROM pg_mydb TABLE 'ods.tt4';
To check the progress of backfilling historical data, find the corresponding internal table using the SHOW INTERNAL TABLES command and query from it.
Data type mapping
The following table shows the corresponding data type in RisingWave that should be specified when creating a source. For details on native RisingWave data types, see Overview of data types.
RisingWave data types marked with an asterisk indicate that while there is no corresponding RisingWave data type, the ingested data can still be consumed as the listed type.
RisingWave cannot correctly parse composite types from PostgreSQL as Debezium does not support composite types in PostgreSQL.
| PostgreSQL type | RisingWave type |
|---|---|
| BOOLEAN | BOOLEAN |
| BIT(1) | BOOLEAN |
| BIT( > 1) | No support |
| BIT VARYING[(M)] | No support |
| SMALLINT, SMALLSERIAL | SMALLINT |
| INTEGER, SERIAL | INTEGER |
| BIGINT, BIGSERIAL, OID | BIGINT |
| REAL | REAL |
| DOUBLE PRECISION | DOUBLE PRECISION |
| CHAR[(M)] | CHARACTER VARYING |
| VARCHAR[(M)] | CHARACTER VARYING |
| CHARACTER[(M)] | CHARACTER VARYING |
| CHARACTER VARYING[(M)] | CHARACTER VARYING |
| TIMESTAMPTZ, TIMESTAMP WITH TIME ZONE | TIMESTAMP WITH TIME ZONE |
| TIMETZ, TIME WITH TIME ZONE | TIME WITHOUT TIME ZONE (assume UTC time zone) |
| INTERVAL [P] | INTERVAL |
| BYTEA | BYTEA |
| JSON, JSONB | JSONB |
| XML | CHARACTER VARYING |
| UUID | CHARACTER VARYING |
| POINT | STRUCT (with form <x REAL, y REAL>) |
| LTREE | No support |
| CITEXT | CHARACTER VARYING* |
| INET | CHARACTER VARYING* |
| INT4RANGE | CHARACTER VARYING* |
| INT8RANGE | CHARACTER VARYING* |
| NUMRANGE | CHARACTER VARYING* |
| TSRANGE | CHARACTER VARYING* |
| TSTZRANGE | CHARACTER VARYING* |
| DATERANGE | CHARACTER VARYING* |
| ENUM | CHARACTER VARYING* |
| DATE | DATE |
| TIME(1), TIME(2), TIME(3), TIME(4), TIME(5), TIME(6) | TIME WITHOUT TIME ZONE (limited to [1973-03-03 09:46:40, 5138-11-16 09:46:40)) |
| TIMESTAMP(1), TIMESTAMP(2), TIMESTAMP(3) | TIMESTAMP WITHOUT TIME ZONE (limited to [1973-03-03 09:46:40, 5138-11-16 09:46:40)) |
| TIMESTAMP(4), TIMESTAMP(5), TIMESTAMP(6), TIMESTAMP | TIMESTAMP WITHOUT TIME ZONE |
| NUMERIC[(M[,D])] | NUMERIC |
| DECIMAL[(M[,D])] | NUMERIC |
| MONEY[(M[,D])] | NUMERIC |
| HSTORE | No support |
| HSTORE | No support |
| INET | CHARACTER VARYING* |
| CIDR | CHARACTER VARYING* |
| MACADDR | CHARACTER VARYING* |
| MACADDR8 | CHARACTER VARYING* |


